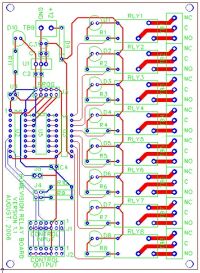

A while back I realized that I was beginning to proliferate multiple relays through my Homevision Control Center. While this worked, I knew eventually I would need some type of relay output board. Homevision supports the Sylva SC8O8I boards which provide 8 inputs and 8 relay outputs and I could have purchased one of them - but where's the fun in that. Besides that I didn't really need any more inputs since I had quite a few still available. This page details my design for a Homevision Relay Board that provides 8 Form C, single pole, double throw, relay outputs with an LED for each relay and a simple method for programming and interfacing with the Homevision controller. Here are a pictures of the bare board and the finished design and below that are details of the hardware and software:
 |
 |
The hardware is pretty simple - a microprocessor, a Darlington driver chip, some resistors, and some relays. The rest of the stuff - LEDs, programming header, etc. is nice but not necessary. For a processor I chose an Atmel AVR ATTINY2313. This is a small 20 pin package with 2KB of flash for programming and more than enough I/O for my needs on this project. The relay driver is a ULN2803A Darlington driver that has been around a long time and is perfect for my needs. The relays are Omron G5SB-14-DC12. These are SPDT devices with Form C contacts that are rated at 5A (NO)/3A (NC) at 30 VDC. I also added terminal strips for easy connection, a diode to protect against reverse power wiring, a board status LED and status LEDs for each relay.
Here are the schematic for the board and PCB layout, you can click on each image to view a larger image.
 |
 |
As it turned out the software was pretty easy as well. I generally like to use either Bascom or AVRStudio Assembler when working with AVR chips. For this project I chose Bascom since the Homevision controller uses I2C to communicate over its expansion port and MCS Electric (the creator of Bascom) can provide an I2C slave library that works with their compiler and makes it very easy to make an I2C slave. The program is quite short and there is a copy of the source code in the downloadable file at the bottom of the page.
When I first started out, I attempted to make my board compatible with the Sylva boards so that you could just plug it in, tell the Homevision software that there was a Sylva board attached, and everything else would be mapped automatically. This worked - almost. With the board attached to the network, I could configure it as a Sylva board and the mapped Homevision outputs would turn the relays off and on correctly. The problem was that, even though I had no inputs on my board, Homevision would occasionally see the first input as on for a scan and then back off again. This only happened for the first mapped input and only randomly and I could never figure out if the problem was my hardware design, the Bascom library, the Homevision I2C network, or the PC application. I could have easily used it this way but the random inputs somehow offended my sensibilities. In the end I chose to program the device in a different method. I chose an unused I2C address for the board and then I used 8 flags and one macro in the Homevision controller. One flag represents the status of each relay and to turn on or off a relay, the program simply sets or clears the appropriate flag and then calls the macro which handles all of the details. This works fine and has been dead reliable. I may some day go back and try to figure it out but I just have other things I would rather work on at the moment.
I used TinyCAD to design the schematic and FreePCB to design the Printed Circuit Board. They are both open source projects that work just fine for my needs. While TinyCAD is no longer supported, there are still quite a few active users and a relatively useful Yahoo group for support. On the other hand, FreePCB is still being very actively developed. The developer is constantly releasing new features and there is a very active user community and forum for support. There are also several advanced users who have developed very useful add-on programs. Finally most of the components came from DigiKey and the boards were fabricated by PCBFabExpress.
The file below includes files for TinyCAD, FreePCB, Bascom, as well as a set of Gerber files for making the board. Please feel free to contact me with comments or ideas.
|