I'm a big fan of the X10 Model SS13A Slimline Wireless Wall Switches. They are only about 1/4" thick and you can stick one up almost anywhere. Each one can transmit an on and off command for 3 contiguous X10 addresses as well as bright and dim. For example, a switch could be configured to transmit D1 through D3 on and off as well as bright and dim. I have one in almost every room. They control speakers on and off, volume control, power window shades, lights, alarm system, well you get the idea. The problem is that you need either an RR501 or TM751 X10 receiver for every house code that you want to use. These plug into outlets, have a somewhat limited range and have been known to lock up on occasion. Enter the W800RF32A.
The W800RF32A is designed and sold by WGL & Associates. This device is about 2.5" X 1.7" X 1.0" and has three connectors - a jack for a 9 volt wall wart, a female DB9 serial connector, and a male F coax connector for a remote antenna. This device receives all X10 basic commands (On, Off, Bright, Dim, All Lights On, All Lights Off) as well as all X10 security commands (more on this later). It then outputs data through the serial port at 4800 baud, no parity, and one stop bit using a simple protocol which they also document on their web site. I installed the device in my basement with my Homevision controller. They supply a length of coax cable but it was a little shorter than I wanted so I made about a 20' length of cable and installed the antenna at the top of the basement stairway approximately centered in my house. The house is about 4000 square feet and it picks up signals from everywhere in the house as well as some of the back yard. In general customers seem to be exceptionally pleased with the range of their devices.
The only problem I had was that Homevision didn't directly support the W800. I originally found XPL and started using that and it worked fine but it was just too much overhead for what I was doing. XPL is a very powerful, open architecture, Home Automation protocol which supports many devices and has a tremendous number of features. Unfortunately this comes at a cost. I had to have two different services and a third application running all the time for my W800 to work and I needed a fourth application to configure actions. I occasionally had conflicts and, because XPL is stil involving, I had a hard time keeping up with new releases. I decided there had to be a better way and thus was born my application.
The program I wrote sits in the background on a PC which is connected to the Homevision Controller and running the Homevision Software. When it receives a message from the W800 on the cofigured COM port, it decodes the message and sends the appropriate Homevision command to the Homevision software via DDE which then sends the command to the Homevision controller over its serial port. The default is to just replicate the same command received i.e. if you press A1 ON on a wireless remote, an A1 ON is sent to Homevision. The neat thing is that the command sent is totally configurable. You can send vitually any command that is valid over the serial port and Homevision seems to support just about anything you can do from the controller. For example you could have A1 ON send a command to run Macro 37 or you could have A1 OFF run a scheduled event or you could have DIM or BRIGHT commands send IR signal to adjust the volume levels of a sound system. The possibilites are seemingly endless.
The other fun thing is that the W800 also supports all of the X10 security devices. I use a number of DS10A devices which are essentially door and window sensors but can be used with anything that produces a contact closure like a limit switch, reed switch, mercury switch, tipping bucket rain guage, moisture detection switch, etc. These devices are powered 2 AA batteries and are available on Ebay all of the time in 3 and 4 packs for about $7 or $8 each. They send a signal each time the contacts are opened or closed and also report in with the contact condition approximately once an hour as a heartbeat. That way you can be sure that the device and the batteries are working. Like with the standard X10 commands, my software can be configured so that the security commands can be mapped to any Homevision command to send the Homevision controller. For example I have one on a door lock bolt and have my system set up to run an 'open' macro or a 'close' macro when I receive a signal from the device. Then, with a flag in the controller, I can keep track of the state of the device. I also track the length of time since the last report in and the number of reports a day and signal an error if the report in time is more than 75 minutes or there are less than 20 reports in a day. I was worried about battery life but that has not been an issue at all, I think most of my current devces have been up more than a year now. Here's an interesting link from a forum discussing possible uses for the DS10A sensors.
To install the software, you just need to unzip the downloaded file and copy the W800toHV.exe application into a folder on your system. The first time you run the application, two additional files will be created in the same directory - a default HVCommands.txt file and a W800toHV.ini file. The HVCommands file has the default X10 commands for all of the X10 addresses for ON, OFF, BRIGHT, and DIM. The W800toHV.ini file is where your personal preferences are stored. I know that Microsoft recommends using the registry now instead of an ini file but this way, if you want to remove the application, you just delete these three files and everything is gone - no uninstall procedure and nothing left over in the registry. If you want to get started quickly, select Configure and then COM Port from the menu, choose the COM port you are plugged into, and press Accept. Now on the main screen, press the Toggle COM Port button to start communications with the W800 and press the Toggle DDE Links button to start the DDE communication with the Homevision application. That's it, you're ready to go.
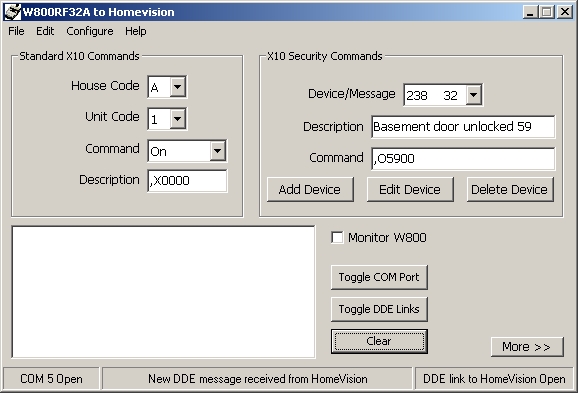
Here's a screenshot of the main screen:
The frame in the upper left of the screen is for working with standard X10 commands. If you would like to change the Homevision command for one of these, select the address you want to change, in the example above that would be A1 ON, and enter the new Homevision command in the HV Command box. You can then select Save from the File menu to save your change. There should be a file in your Homevision folder titled SERIAL.DOC. This is an excellent reference to all of the serial commands and their formats and arguments.
The frame on the upper right is for working with X10 security devices. Using the appropriate buttons, you can either Add, Edit, or Delete Devices from the list. You can edit HV Commands and Descriptions directly in the on screen boxes, but you must choose edit to modify either a Device ID or Message number. Since IDs are generated randomly when a device is first powered up, you may need to know the Device ID and Message number to add. You can click the Monitor W800 checkbox and then activate your device to read the information in the text box on the left of the screen. When the Monitor W800 box is checked, X10 addresses and Device ID and Message numbers are printed in the text box but no command is sent to the Homevision application. Make sure to uncheck the box when you want to go back into operation.
The text box on the bottom left of the window, besides reading X10 addresses and Device IDs, also displays all of the DDE messages sent by the Homevision controller. If you have other DDE applications running, like ACE, as I do, you will see those messages as well. We've already discussed the use of the two Toggle buttons and the Clear button just clears the text box. Finally the More button opens up the screen to reveal raw DDE data. You can read about this information in more detail on Craig's DDE developers page. There's also a status bar across the bottom of the page. The left section reports COM Port status, the right section reports DDE Link status, and the center section reports general status messages.
The File menu contains a Save and an Exit command. The Save command will be disabled if no changes have been made and the Exit command will close the COM Port and DDE Links. The Edit command has the traditional Cut, Copy, and Paste commands. The Configure menu has a COM Port command that opens a dialog box to select a COM Port. It will display all of the currently available COM ports up to 16. If a COM Port is currently open, this menu item will be disabled. Please toggle the COM port off to access this option. The configure menu also has a Startup command to select your startup options. The current option are: Open COM Port, Start DDE Links, and Start Minimized. If you check all of these boxes and place a shortcut to the application in your startup folder, everything should run fine. Finally the Help menu contains a Help command and an About command.
There are several items which either are not finished, not tested, or may never be finished:
|